
Vue.js (VueJS or Vue) is a JavaScript framework used to develop interactive web interfaces on the front end.
Vue.js is often compared to Angular. Vue.js vs Angular — what’s the main difference? Both are frameworks, but Angular provides a lot of built-in features and uses TypeScript.
And what about Vue.js vs React? Vue.js is a framework, and React is a library. While React uses JSX where CSS and HTML are part of JS, Vue.js uses HTML, JavaScript, and CSS separately.
Before you jump into Vue.js, make sure you’re familiar with CSS, HTML, DOM, and have a basic understanding of JavaScript and its ES6 features.
Set Up
First, you need to set up a Vue.js development environment.
1. Install Node.js globally on your machine. Type this command in your terminal:
npm install nodejs
2. Install Vue CLI, or the Vue Command Line Interface, globally on your machine:
npm i -g @vue/cli @vue/cli-service-global
Vue CLI provides build setups including hot-reload, lint-on-save, and production-ready builds.
3. Use vue create to create a live development server, run your Vue application, automatically compile Vue and Babel, with SCSS support (and Linter if you wish).
vue create vue-app
If you’re familiar with React: vue create is the equivalent to create-react-app. And vue-app is the name of the folder that will contain your Vue application.
4. Choose features for your project. You’ll be given a set of options. Use an arrow on your keyboard to select “Manually select features”:
Vue CLI v4.5.4
? Please pick a preset:
  Default ([Vue 2] babel, eslint)
  Default (Vue 3 Preview) ([Vue 3] babel, eslint)
> Manually select features
Then press Enter. You will see another set of options. Choose the features needed for your project with the keyboard arrow:
? Check the features needed for your project:
 (*) Choose Vue version
 (*) Babel
 ( ) TypeScript
 ( ) Progressive Web App (PWA) Support
 ( ) Router
 ( ) Vuex
>( ) CSS Pre-processors
 ( ) Linter / Formatter
 ( ) Unit Testing
 ( ) E2E Testing
Press Enter and select a version of Vue.js (we’ll use Vue.js 2):
? Choose a version of Vue.js that you want to start the project with (Use arrow keys)
> 2.x
  3.x (Preview)
Finish the setup and wait for your project to be created.
5. Launch your Vue app by running the following code in your terminal:
cd vue-app
npm run serve
After that, you’ll see the following message:
DONE  Compiled successfully in 19391ms

  App running at:
  - Local:   http://localhost:8080/
  - Network: http://192.168.100.17:8080/

  Note that the development build is not optimized.
  To create a production build, run npm run build.
Your Vue.js project is available at http://localhost:8080/. Follow this link, and you’ll see the Vue default page:

File Structure
Open your folder where you installed the environment (mine is in C:\Users\Shark\vue-app) and you’ll see the following file structure:
vue-app
├── .git
├── node_modules
├── public
│   ├── favicon.ico
│   ├── index.html
├── src
│   ├── assets
│   ├──├── logo.png
│   ├── components
│   ├──├── HelloWorld.vue
│   ├── App.vue
│   ├── main.js
├── .browserslistrc
├── .eslintrc
├── .gitignore
├── babel.config
├── package.json
├── package-lock.json
├── README.md
Your general HTML file is public/index.html.
You’ll import files in src/main.js and write your Vue/JS code in src/App.vue as well as in other .vue files you’ll create later.
See any changes you made at http://localhost:3000/.
Open your src folder, create a new folder named “styles” there, and create style.scss inside it.
For our future app, we’ll need to delete src/components/HelloWorld.vue and add there two files for two Vue.js components: src/components/Question.vue and src/components/Result.vue.
The final file structure will look like this:
vue-app
├── .git
├── node_modules
├── public
│   ├── favicon.ico
│   ├── index.html
├── src
│   ├── assets
│   ├──├── logo.png
│   ├── components
│   ├──├── Question.vue
│   ├──├── Result.vue
│   ├── styles
│   ├──├── style.scss
│   ├── App.vue
│   ├── main.js
├── .browserslistrc
├── .eslintrc
├── .gitignore
├── babel.config
├── package.json
├── package-lock.json
├── README.md
App.vue will manage your app’s general logic, and Question.vue and Result.vue will display two main blocks of our app. We’ll explain the app structure in the section “Vue.js Example”.
It’s recommended to install Vue.js DevTools, which is a Chrome extension for Vue.js. It will help you inspect a Vue.js tree, the component hierarchy, state, props, and more. This extension is also available for Firefox.
Import
You can write CSS rules in Vue.js component files, inside the <style> tag. But for our project, we created a separate CSS file.
Open your src/main.js file and import the style.scss file:
// src/main.js

import Vue from 'vue'
import App from './App.vue'
import './styles/style.scss'
Components
A Vue.js app consists of components or building blocks. Each component normally has the following structure:
<template></template>

<script></script>

<style scoped></style>
These tags contain HTML, JS, and CSS, correspondingly:
- <template>: contains HTML
- <script>: contains data and logic for the component
- <style>: contains CSS; the scoped attribute allows us to scope the CSS so the rules only apply to this component and not globally
The standard structure of the <script> tag is as follows:
<script>
    export default {
        name: 'ComponentName', // The name of the current component
        components: {}, // Other components included in the current component. If there are no child components, you can use the props property to set the basic parameters
        data() {}, // Objects that will be used to fill elements with data
        watch: {}, // The property that observes and reacts to data changes based on some other data
        computed: {}, // Computed properties
        methods: {} // Custom methods
    }
</script>
Vue.js Example
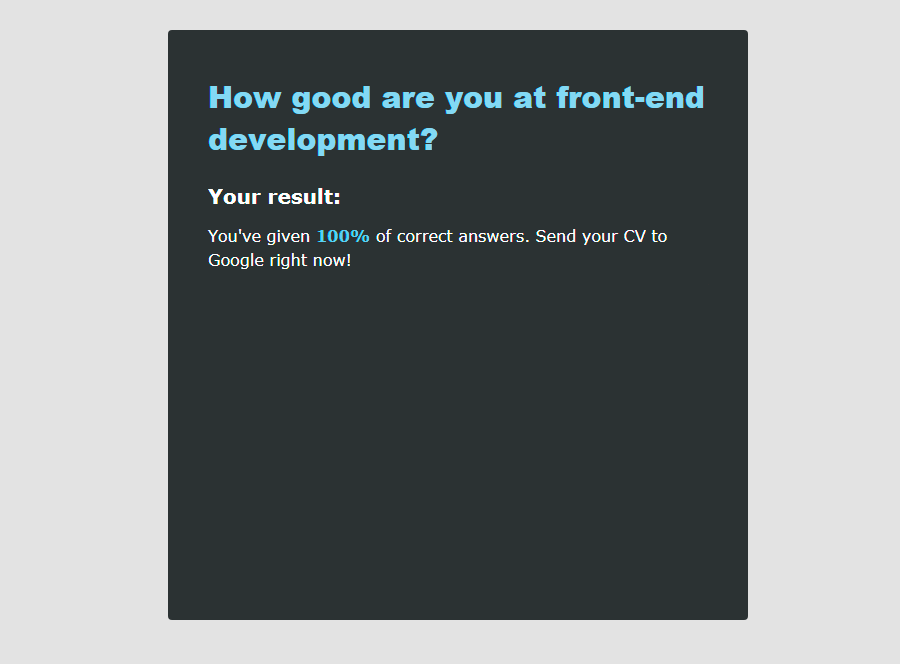
Now let’s start creating a Vue.js app. It will be a quiz interface that has three quiz slides with questions, answers, and buttons, and the final slide with quiz results. Here’s the final look of the first and the last slides:
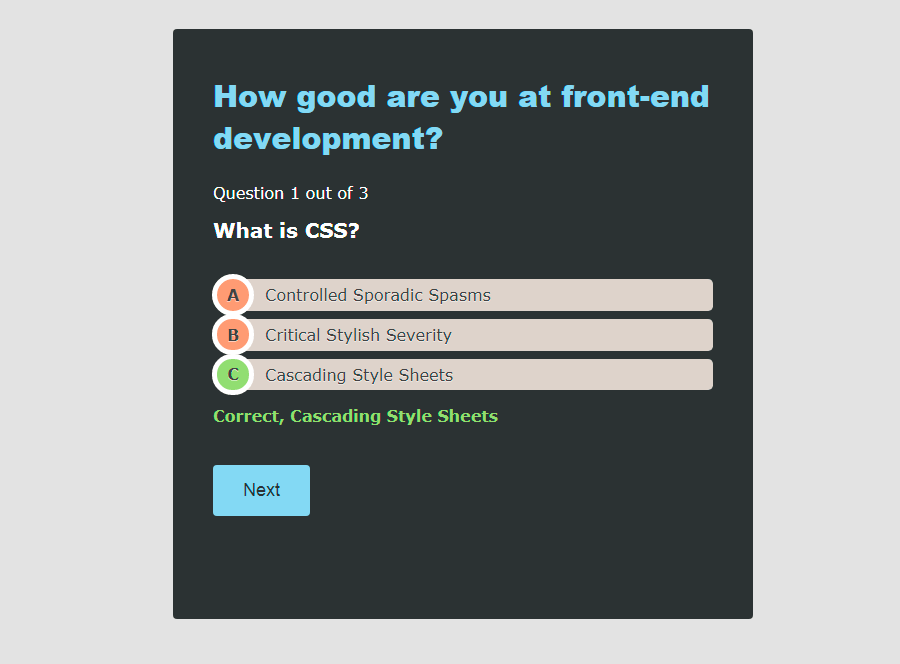
The correct answers and the “Next” button will be first hidden and then shown upon clicking on one of the options.
To see how the finished app will work, you can access it on GitHub Pages. It was originally built with React. Now we’ll create a similar one with Vue.js.
App structure
You won’t need to write HTML since the files built with Vue.js will later be auto-injected in the #app element in your public/index.html file:
// public/index.html

<!DOCTYPE html>
<html lang="en">
  <head>
    <meta charset="utf-8">
    <meta http-equiv="X-UA-Compatible" content="IE=edge">
    <meta name="viewport" content="width=device-width,initial-scale=1.0">
    <link rel="icon" href="<%= BASE_URL %>favicon.ico">
    <title><%= htmlWebpackPlugin.options.title %></title>
  </head>
  <body>
    <noscript>
      <strong>We're sorry but <%= htmlWebpackPlugin.options.title %> doesn't work properly without JavaScript enabled. Please enable it to continue.</strong>
    </noscript>
    <div id="app"></div>
    <!-- built files will be auto injected -->
  </body>
</html>
Instead, we’ll work with three Vue files:
- App.vue will manage your app’s logic
- Question.vue will display the current slide and process the user’s actions
- Result.vue will display the quiz results
App.vue
This component would be responsible for managing our app’s general logic such as showing the general markup as well as choosing whether to show a slide with a question or the final slide with quiz results.
Here’s the markup we would like the web page to render:
<div id="app">
    <article>
        <header></header>
        <div>
            /* An element that contains a slide with a question, options, and the correct answer */
        </div>
        <div>
            /* An element that contains the final slide with quiz results */
        </div>
    </article>
</div>
First, we’ll wrap this markup with the <template> tag as all HTML in Vue.js components should be contained inside this tag. Next, we’ll change <div> elements with slides to <template> tags for conditional rendering. These <template> elements will serve as invisible wrappers, and the final rendered result will not include them.
A conditional rendering means we use v-if and v-else directives (like if/else statements in JavaScript) to choose conditionally between two options: a question/answers slide or the final slide with quiz results. The specific block will only be rendered if the directive’s expression returns a truthy value. In our case, this would be the isEnd() function returning a false value (meaning the quiz reached its last slide).
Inside these two <template> elements, we’ll put two corresponding components: <Question /> and <Result /> (Question.vue and Result.vue). They will render question slides and the result slides, correspondingly.
<template>
    <div id="app">
        <article>
            <header>
                <h1>How good are you at front-end development?</h1>
            </header>
            <template v-if="!isEnd">
                <Question />
            </template>
            <template v-else>
                <Result />
            </template>
        </article>
    </div>
</template>
Next, we want to add data inside our components, but we want to use data in the form of arrays and objects instead of hardcoding all our values into HTML tags. So let’s add the data() method and return objects with questions and answers. This will be contained inside the <script> tag.
<script>
    // Import components
    import Question from './components/Question';
    import Result from './components/Result';

    export default {
        name: 'App',

        components: {
            Question,
            Result
        },
        // The data() method will return objects with questions and answers
        data() {
            return {
                questions      : [
                    {
                        title  : 'What is CSS?',
                        answers: [
                            {text: 'Controlled Sporadic Spasms'},
                            {text: 'Critical Stylish Severity'},
                            {text: 'Cascading Style Sheets', isCorrect: true},
                        ],
                    },
                    {
                        title  : 'What is not a front-end  tool?',
                        answers: [
                            {text: 'Webpack'},
                            {text: 'Tortilla', isCorrect: true},
                            {text: 'Gulp'},
                        ],
                    },
                    {
                        title  : 'What is an HTML tag for an ordered list?',
                        answers: [
                            {text: '<ol>', isCorrect: true},
                            {text: '<list>'},
                            {text: '<ul>'},
                        ],
                    },
                ],
                currentQuestion: 0,
                correctAnswers : 0,
            };
        },

        computed: {
            isEnd() {
                return this.questions.length <= this.currentQuestion;
            },

            result() {
                return Math.round((this.correctAnswers / this.questions.length) * 100);
            }
        },

        // nextQuestion() will increment the counter of correct answers (correctAnswers) if the answer submitted by the user is correct
        methods: {
            nextQuestion(answer) {
                if (answer.isCorrect) {
                    this.correctAnswers++;
                }

                this.currentQuestion++;
            }
        },
    };
</script>
Now let’s return to our <template> tag. We’ll pass the data from the data() method as properties. To do this, we’ll use an attribute that begins with a colon :, for example, <Result :result="result" />. We’ll also add some HTML tags to show the question number like “Question 1 out of 3”.
Here’s the final content of the App.vue file:
<template>
    <div id="app">
        <article>
            <header>
                <h1>How good are you at front-end development?</h1>
            </header>
            <template v-if="!isEnd">
                <section>
                    <p>Question {{ currentQuestion + 1 }} out of {{ questions.length }}</p>
                    <Question :question="questions[currentQuestion]" @nextQuestion="nextQuestion" />
                </section>
            </template>
            <template v-else>
                <Result :result="result" />
            </template>
        </article>
    </div>
</template>

<script>

    import Question from './components/Question';
    import Result from './components/Result';

    export default {
        name: 'App',

        components: {
            Question,
            Result
        },

        data() {
            return {
                questions      : [
                    {
                        title  : 'What is CSS?',
                        answers: [
                            {text: 'Controlled Sporadic Spasms'},
                            {text: 'Critical Stylish Severity'},
                            {text: 'Cascading Style Sheets', isCorrect: true},
                        ],
                    },
                    {
                        title  : 'What is not a front-end  tool?',
                        answers: [
                            {text: 'Webpack'},
                            {text: 'Tortilla', isCorrect: true},
                            {text: 'Gulp'},
                        ],
                    },
                    {
                        title  : 'What is an HTML tag for an ordered list?',
                        answers: [
                            {text: '<ol>', isCorrect: true},
                            {text: '<list>'},
                            {text: '<ul>'},
                        ],
                    },
                ],
                currentQuestion: 0,
                correctAnswers : 0,
            };
        },

        computed: {
            isEnd() {
                return this.questions.length <= this.currentQuestion;
            },

            result() {
                return Math.round((this.correctAnswers / this.questions.length) * 100);
            }
        },

        methods: {
            nextQuestion(answer) {
                if (answer.isCorrect) {
                    this.correctAnswers++;
                }

                this.currentQuestion++;
            }
        },
    };
</script>
Question.vue
This component will display the current slide and process the user’s actions.
Here’s the markup we would like the web page to render:
<div class="question">
    <h2>What is CSS?</h2>
    <ol class="options">
        <li><a href="#">Controlled Sporadic Spasms</a></li>
        <li><a href="#">Critical Stylish Severity</a></li>
        <li><a href="#">Cascading Style Sheets</a></li>
    </ol>
    <p class="answer correct">Correct, Cascading Style Sheets</p>
    <button class="btn">Next</button>
</div>
We’ll wrap all this with the <template> tag. Instead of hardcoding all <li> elements, we can use answer.text (from the data() method in App.vue file).
We’ll also use conditional class style binding: the class of our <li> elements will depend on whether the chosen answer is correct. We can loop through the data in question.answers (from the data() method in App.vue file) with the v-for attribute.
<li v-for="answer in question.answers" :class="choosenAnswer ? (answer.isCorrect || false ? 'green' : 'red') : ''">
    <a href="#" @click="getAnswer(answer)">{{ answer.text }}</a>
</li>
When the user clicks on an answer, the code checks whether the answer is correct and chooses the class: .green (if the answer is correct) or .red (if the answer is wrong). For this, we’ll need to add these classes in our styles.css file:
.green a::before {
  background: green;
}
.red a::before {
  background: red;
}
We’ll also use conditional class style binding to add the class .correct to the element with the correct answer (.answer) when the chosen answer is correct:
<p class="answer" :class="{ correct: choosenAnswer.isCorrect || false }">
    <template v-if="choosenAnswer.isCorrect">Correct,</template>
    <template v-else>Incorrect, the correct answer is</template>
        {{ correctAnswer.text }}
</p>
We need to add the .correct class in our styles.css file:
.correct {
  color: green;
}
Here’s the full content of the <template> tag of the Question.vue component:
<template>
    <div class="question">
        <h2>{{ question.title }}</h2>
        <ol class="options">
            <li
                v-for="answer in question.answers"
                :class="choosenAnswer ? (answer.isCorrect || false ? 'green' : 'red') : ''"
            >
                <a href="#" @click="getAnswer(answer)">{{ answer.text }}</a>
            </li>
        </ol>
        <div v-if="choosenAnswer">
            <p class="answer" :class="{ correct: choosenAnswer.isCorrect || false }">
                <template v-if="choosenAnswer.isCorrect">Correct,</template>
                <template v-else>Incorrect, the correct answer is</template>
                {{ correctAnswer.text }}
            </p>
            <button @click="nextQuestion" class="btn">Next</button>
        </div>
    </div>
</template>
@click="getAnswer(answer) and @click="nextQuestion" are functions that get the chosen answer and show the next slide. We’ll define them in the <script> tag:
<script>
    export default {
        name: 'Question',

        props: {
            question: Object
        },

        data() {
            return {
                choosenAnswer: null,
            };
        },

        watch: {
            question() {
                this.choosenAnswer = null;
            }
        },

        computed: {
            correctAnswer() {
                return this.question.answers.find(answer => answer.isCorrect)
            }
        },

        methods: {
            getAnswer(answer) {
                if (this.choosenAnswer) {
                    return;
                }

                this.choosenAnswer = answer;
            },

            nextQuestion() {
                this.$emit('nextQuestion', this.choosenAnswer);
            }
        }
    };
</script>

<style scoped></style>
Result.vue
This component will display the quiz results.
Here’s the markup we would like the web page to render:
<div>
    <h2 class"result-title">Your result:</h2>
    <p id="summary">You've given <span>100%</span> of correct answers. Send your CV to Google right now!</p>
</div>
We’ll wrap all this with the <template> tag and use the result and tip properties instead of text.
<template>
    <div>
        <h2 class="result-title">Your result:</h2>
        <p id="summary">
            You've given <span>{{ result }}%</span> of correct answers. {{ tip }}
        </p>
    </div>
</template>
The result property was defined in the App.vue, and tip will be defined inside the <script> tag in Result.vue.
The tip property will define the part of the text with result that will depend on how much the user scored. For example, if the user gave 100% of correct answers, the tip property will display “Send your CV to Google right now!”.
<script>
    export default {
        name: 'Result',

        props: {
            result: Number
        },

        computed: {
            tip() {
                if (this.result <= 30) {
                    return "Don't give up and learn JavaScript!";
                } else if (this.result <= 50) {
                    return "You can start your Junior Front-End Developer career at Dominos' Pizza!";
                } else if (this.result <= 90) {
                    return "Well done! You're better than average!";
                }

                return "Send your CV to Google right now!";
            }
        }
    };
</script>

<style scoped></style>
Production Build and Deployment
You might want to deploy your newly completed app to GitHub Pages, a static site host.
1. Visit the GitHub and log in there.
2. Create a New Repository and name it as “vue-app” or give it another name as you like. To publish your app on GitHub Pages, your repository must be public.
git remote add origin https://github.com/username/vue-app
git add .
git commit -m "initial commit"
git push -u origin master
3. Create a gh-pages branch.
git checkout -b gh-pages
4. Remove the dist directory from .gitignore, create vue.config.js and add the publicPath of your GitHub:
// vue.config.js
module.exports = {
  publicPath: 'vue-app',
}
5. Create a build, which will output the dist folder.
npm run build
6. Add the build, commit, and send it to gh-pages on GitHub.
git add dist
git commit -m "gh-pages commit"
git subtree push --prefix dist origin gh-pages
After that, you’ll see your app running live on GitHub Pages.
Read also: