
React (ReactJS or React.js) is a popular JavaScript library used for building reusable user-interface (UI) components on the front end. This library changes content on the web page without reloading it. It updates only what’s necessary, without slowing the web page down.
React is often compared to Angular. React.js vs Angular — what’s the main difference? Unlike React, Angular is a large framework that offers out-of-the-box solutions. And React is only a library that helps effectively render DOM and create dynamic web pages. When using React, you may decide yourself how to create application architecture.
Before you plunge into React, make sure you’re familiar with CSS, HTML, DOM, and have the basic understanding of JavaScript and its ES6 features.
Set Up
How to install React.js? First of all, you need to set up a React development environment:
1. Install Node.js globally on your machine. Type this command in your terminal:
npm install nodejs
2. Use Create React App to create a live development server, run your React application, automatically compile React and JSX, auto-prefix CSS files, and use ESLint to warn about mistakes in your code.
Run the following command in your terminal (where my-app is the name of the folder that will contain your React application):
npx create-react-app my-app
After that, you’ll see the following message in your terminal along with some other information:
npx: installed 98 in 36.358s
Success! Created my-app at C:\Users\Shark\my-app
3. Launch your React app by running the following code in your terminal:
cd my-app
npm start
(If you turn off your computer, run these two commands every time you want to access your React app.)
After that, you’ll see the following message in your terminal:
> my-app@0.1.0 start C:\Users\Shark\my-app
> react-scripts start

Compiled successfully!

You can now view my-app in the browser.

  Local:            http://localhost:3000
  On Your Network:  http://192.168.100.17:3000

Note that the development build is not optimized.
To create a production build, use npm run build.
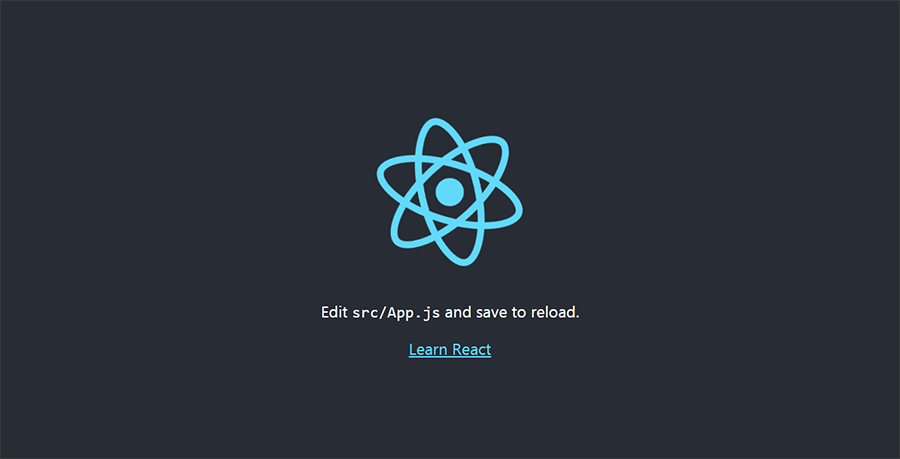
A new window will be opened in your browser automatically at http://localhost:3000/:
Now let’s look at the file structure of your new app in the my-app folder.
File Structure
Open your folder where you installed the environment (mine is in C:\Users\Shark\my-app) and you’ll see the following file structure:
my-app
├── README.md
├── node_modules
├── package.json
├── package-lock.json
├── .gitignore
├── public
│   ├── favicon.ico
│   ├── index.html
│   ├── logo192.png
│   ├── logo512.png
│   └── manifest.json
│   └── robots.txt
└── src
    ├── App.css
    ├── App.js
    ├── App.test.js
    ├── index.js
    ├── logo.svg
    └── serviceWorker.js
    └── setupTests.js
Your general HTML file is public/index.html.
You’ll write your React/JS code in src/index.js. See any changes you made in index.js opened at http://localhost:3000/.
Tools and Extensions
If you use VS Code, you may find useful the following extensions for better React experience:
- Bracket Pair Colorizer
- ES7 React/Redux/GraphQL/React-Native snippets (provides shortcuts for React)
- indent-rainbow (provides colored indentations)
- Prettier - Code Formatter
You might also want to edit your settings.json file. You can access it by pressing Ctrl + Shift + P and selecting “Preferences: Open Settings (JSON)”. You can edit this file to enable minimap, set font size and family, format code on save, add Emmet abbreviations for JSX, and more. I edited it the following way:
{
    "editor.minimap.enabled": false,
    "editor.defaultFormatter":  "esbenp.prettier-vscode",
    "[javascript]": {
        "editor.defaultFormatter":  "esbenp.prettier-vscode"
    },
    "emmet.includeLanguages": {
        "javascript": "javascriptreact",
    },
    "editor.autoClosingBrackets": "always",
    "editor.fontFamily": "Inconsolata, Monaco, Consolas, 'Courier New', Courier;",
    "python.pythonPath": "C:\\Python37\\python.exe",
    "files.autoSave": "afterDelay",
    "terminal.integrated.fontFamily": "Consolas",
    "editor.formatOnPaste": true,
    "editor.formatOnSave": true,
    "javascript.updateImportsOnFileMove.enabled": "always",
    "editor.fontSize": 17,
}
It’s also recommended to install React Developer Tools, which is a Chrome DevTools extension for React. It will help you inspect a React tree, the component hierarchy, state, props, and more.
Import
Open your src/index.js file, delete everything, and import React and ReactDOM. Import a CSS file (e.g. style.css) if you’ve created a new one.
import React from "react";
import ReactDOM from "react-dom";
import "./style.css";
Additional considerations
Looking further forward, you can break your code into several pieces and import them correspondingly. This is useful if you’re working on a large project.
You can store each of your functions at separate JS files and import them into your main JS file. For example, if you have an arrow function named showAnswer, you can put it into a JS file named showAnswer.js:
import React from "react";

const showAnswer = () => (
    // Your code
);

export default showAnswer;
Then import this function into your App.js file:
import showAnswer from "./showAnswer";

const App = () => (
    // Your code
);
Note that your file’s name should coincide with the component/function name. In other words, your App code must be in App.js, showAnswer code must be contained within showAnswer.js, etc.
For the sake of simplicity and a small scale of our project, we’ll store all our React/JS code in index.js.
You can also store your CSS code not in .css files but in .js files. Here is an example:
// src/style.js:

const style = {
  form {
    margin: 0;
    font-family: Verdana;
    padding: 30px 0;
    background: #e2e2e2;
    color: #fff;
  }

  h1 {
    font-size: 30px;
    font-family: "Arial Black";
    color: #a0d8f3;
  }
};

export default style;
Then you’ll need to import style.js in the .js file that will use those CSS rules, for example, Playfield.js:
import style from './style';

const Playfield = () => {
    return (
        <h1 style={style.h1}></h1>
        <form style={style.form}>
        </form>
    );
}

export default Playfield;
React.js Example
I started to learn React with a very basic understanding of JavaScript a week ago, and, for purely educational purposes, I designed a simple quiz interface using React and JS. This whole project may not be perfect, but I hope my experience will help you get an understanding of React.
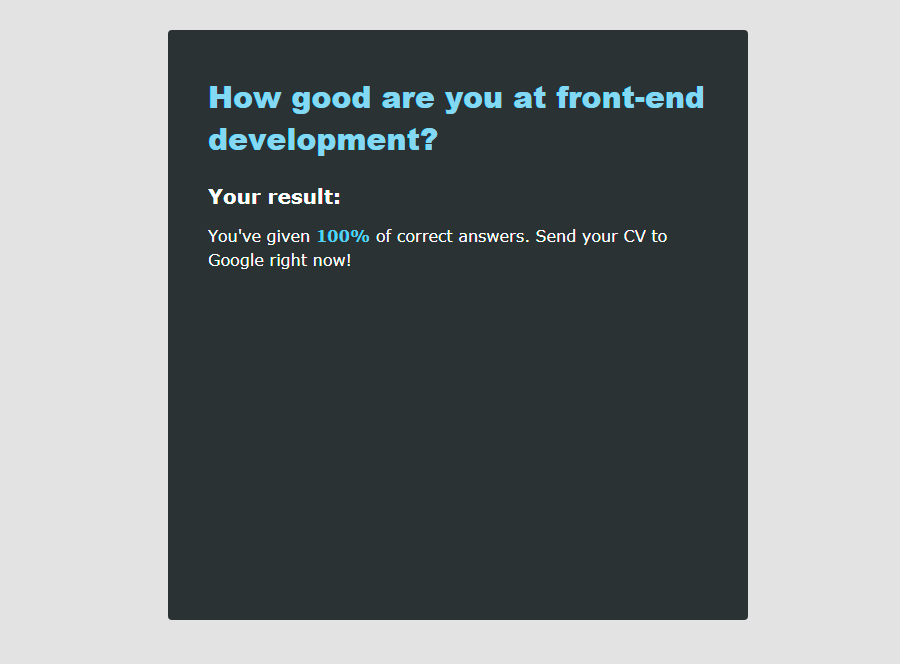
Now let’s start creating a React app. It will be a quiz interface that has three quiz slides with questions, answers and buttons, and the final slide with quiz results. Here’s the final look of the first and the last slides:
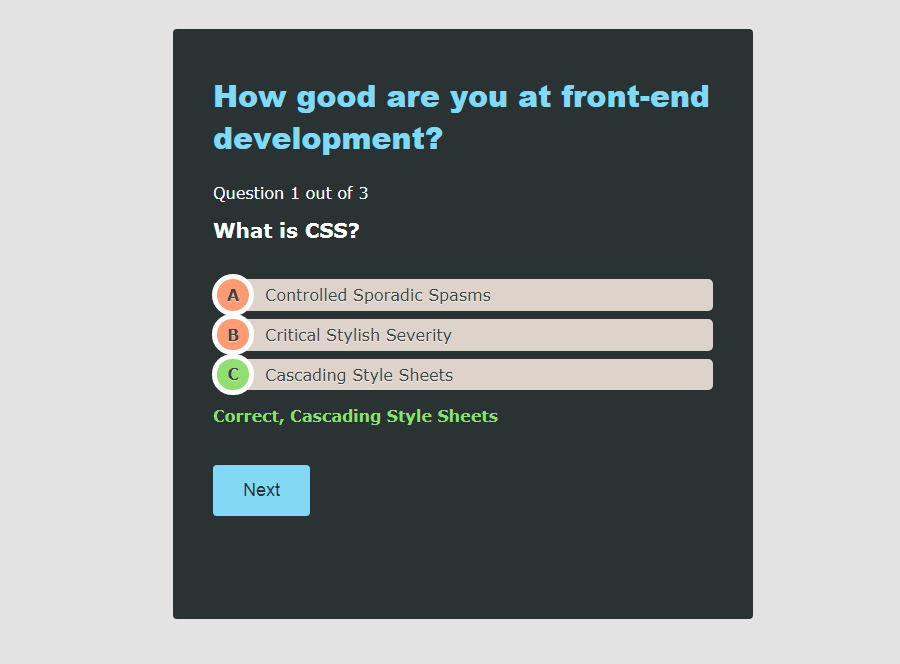
The correct answers and the “Next” button will be first hidden and then shown upon clicking on one of the options.
To see how the finished app will work, access it on GitHub Pages.
App structure
To create a quiz app, we’ll need the following:
1. Data array with text data that will be later used in React components.
2. Three React components: for individual slides, for the final slide with quiz results, and for a block that contains other components.
3. Three JavaScript functions that will allow us to show the answer and button, to show the next slide, and to check how much the user scored.
4. ReactDOM.render method that will allow us to render React components and elements in DOM.
Here’s the backbone:
// src/index.js

// 0. Import statements

import React from "react";
import ReactDOM from "react-dom";
import "./index.css";

// 1. Data array

let data = []

// 2. JavaScript functions

const showAnswer = () => {
    // This function will show the correct answer upon clicking on one of the options and will show the “Next” button
}

const showNextSlide = () => {
    // This function will show the next slide. If there are no more quiz slides, it will show the final slide with the quiz results
}

const checkAnswers = () => {
    // This function will calculate the number of correct answers and show the result on the final slide
}

// 3. React components

const Quiz = () => (
    // A component for each of the slides with questions, options, the answer, and the “Next” button
);

const Result = () => (
    // A component for the final slide with the quiz result
);

const Playfield = () => (
    // A component that contains slides and other elements you might want to add
);

// 4. Rendering method

ReactDOM.render(
  <Playfield />,
  document.getElementById("react-container")
);
This last element (document.getElementById("react-container")) is a parent element in public/index.html which will contain all your React elements:
// public/index.html

<!DOCTYPE html>
<html>
  <head>
    <meta charset="utf-8">
    <title>Sample React Project</title>
  </head>
  <body>
    <!-- Container with React code from index.js -->
    <div id="react-container"></div>
  </body>
</html>
1. Data array
One of the main benefits of using React is the ability to separate data from user interface elements.
So let’s first create an array of objects with data that we’ll later use in React components. Here are three objects for each of three slides, with the slide number (numSlide), a question, options, and the correct answer:
let data = [
  {
    numSlide: 1,
    question: "What is CSS?",
    options: [
      { option: "Controlled Sporadic Spasms" },
      { option: "Critical Stylish Severity" },
      { option: "Cascading Style Sheets" },
    ],
    answer: "Cascading Style Sheets",
  },
  {
    numSlide: 2,
    question: "What is not a front-end  tool?",
    options: [
      { option: "Webpack" },
      { option: "Tortilla" },
      { option: "Gulp" },
    ],
    answer: "Tortilla",
  },
  {
    numSlide: 3,
    question: "What is an HTML tag for an ordered list?",
    options: [
      { option: "<ol>" },
      { option: "<list>" },
      { option: "<ul>" }],
    answer: "<ol>",
  },
];
2. React components
If you used only HTML and CSS, you would have to repeat the same elements over and over again. You’d create three blocks for slides, each with its own buttons, titles, blocks of options, etc.
React allows you to create just one component and pass data to each component as properties in its HTML tags.
A component is a small reusable block of code. If a part of your code is used several times (a button or another repeated element), you’d better extract it to a separate component.
Components can be of two types: class components and functional components. The simplest way to create a React component is to create an arrow function:
const Quiz = () => (
    <h2>{question}</h2>
);
This is the same as the following code:
function Quiz() {
    return (
        <h2>{question}</h2>
    );
}
You can also create a class component, for example:
class Quiz extends React.Component {
  render() {
    return <h2>{question}</h2>;
  }
}
Always start component names with a capital letter. Otherwise, they will be treated as DOM tags when rendering. For example, <div /> represents an HTML div tag, but <Quiz /> is a React component.
In our app, we’ll create three functional components:
1. <Quiz />: a component for each of the slides with questions, options, the answer, and the “Next” button.
2. <Result />: a component for the last slide with the quiz results.
3. <Playfield />: a component that will contain two other components.
const Quiz = () => (
    // A component for each of the slides with questions, options, the answer, and the “Next” button
);

const Result = () => (
    // A component for the final slide with the quiz result
);

const Playfield = () => (
    // A component that contains slides and other elements you might want to add
);
Inside each of these functions, we’ll put the JSX code. JSX stands for “JavaScript XML”. It’s a JavaScript syntax extension that allows us to write HTML in React. With JSX, you can write expressions inside curly braces {} including variables, properties, and functions.
Quiz: a component for individual slides
Each of three individual slides will be represented by a component called “Quiz”. It will look like an arrow JavaScript function that returns JSX code — the same old HTML, only with variables and functions:
const Quiz = ({ numSlide, question, options, answer }) => (
  <div className={"slide " + (numSlide === 1 ? "visible" : "invisible")}>
    <p>Question {numSlide} out of {data.length}</p>
    <h2>{question}</h2>
    <ol className="options">
      {options.map((option, i) => (
        <li onClick={(e) => showAnswer(answer, option.option, e)} className="options-item" key={i}>
          <a href="#">{option.option}</a>
        </li>
      ))}
    </ol>
    <p className="answer"><span></span> {answer}</p>
    <button onClick={showNextSlide} className="button">Next</button>
  </div>
);
Later, this will be rendered as the following HTML block:
<div class="slide visible">
    <p>Question 1 out of 3</p>
    <h2>What is CSS?</h2>
    <ol className="options">
        <li><a href="#">Controlled Sporadic Spasms</a></li>
        <li><a href="#">Critical Stylish Severity</a></li>
        <li><a href="#">Cascading Style Sheets</a></li>
    </ol>
    <p className="answer"><span>Correct,</span> Cascading Style Sheets</p>
    <button className="button">Next</button>
</div>
The Quiz component’s function takes data array properties (numSlide, question, options, answer) as its arguments and uses them to create classes or text inside HTML elements.
For example, <div className={"slide " + (numSlide === 1 ? "visible" : "invisible")}> means that if the slide number is 1, it will have the class “slide visible”. Otherwise, its class will be “slide invisible”.
For this function to work, we also need to add two classes in our CSS file:
// src/style.css

.visible { display: block; }
.invisible { display: none; }
<p>Question {numSlide} out of {data.length}</p> means the function takes the slide number and the length of the data array to display “Question 1 out of 3”.
options.map((option, i) => () is an array method that provides a function for each element in an array. To iterate across the array, each of your elements inside the list should have a key property (i).
onClick={(e) => showAnswer(answer, option.option, e) and onClick={showNextSlide} are an event that executes a JavaScript function (showAnswer) when the element is clicked.
Result: a component for the page with quiz results
This component is describing the final slide with the quiz result.
const Result = () => (
  <div className="last-slide">
    <h2 className="result-title">Your result:</h2>
    <p id="summary"></p>
  </div>
);
Later, this will be rendered as the following HTML block:
<div className="last-slide">
    <h2 className="result-title">Your result:</h2>
    <p id="summary">You've given 100% of correct answers. Send your CV to Google right now!</p>
</div>
Playfield: a component containing all other components
The third component is describing the general markup that includes both <Quiz /> and <Result /> components:
const Playfield = ({ title, quizes }) => (
  <article>
    <header>
      <h1>{title}</h1>
    </header>
    <section className="quizes">
      {quizes.map((quiz, i) => (<Quiz key={i} {...quiz} />))}
    </section>
    <section id="result" className="invisible">
      <Result />
    </section>
  </article>
);
3. JavaScript functions
To make our quiz interface alive, we’ll need three JavaScript functions:
1. showAnswer: to show the answer and the “Next” button.
2. showNextSlide: to hide the current slide, to show the next one, and to display the final slide with quiz results.
3. checkAnswers: to verify how much the user scored and to choose which message to display as a result.
showAnswer
This function is called within the <Quiz /> component:
<li onClick={(e) => showAnswer(answer, option.option, e)} className="options-item" key={i}>
    <a href="#">{option.option}</a>
</li>
Here is the full code for the showAnswer function:
let correctAnswers = 0;

const showAnswer = (correctAnswer, userAnswer) => {
  let slide = document.querySelector(".slide.visible");
  let answerText = slide.getElementsByClassName("answer")[0];
  answerText.style.display = "none" ? "block" : "none";
  slide.getElementsByClassName("button")[0].style.display = "none" ? "block" : "none";
  let optionsItems = slide.getElementsByClassName("options-item");
  optionsItems.disabled = true;

  for (var i = 0; i < optionsItems.length; i++) {
    optionsItems[i].classList.add("disabled");
    if (optionsItems[i].innerText === correctAnswer) {
      optionsItems[i].classList.add("green");
    } else {
      optionsItems[i].classList.add("red");
    }
  }

    if (correctAnswer === userAnswer) {
      correctAnswers++;
      answerText.childNodes[0].innerHTML = "Correct,";
      answerText.classList.add("correct");
    } else {
      answerText.childNodes[0].innerHTML = "Incorrect, the correct answer is";
      answerText.classList.add("incorrect");
    }
}
This function takes two arguments: correctAnswer and userAnswer. They correspond to answer and option.option defined in the onClick event inside the <li> element.
Here is what this function does:
1. It finds the current visible slide.
2. It finds the element with the class .answer on the visible slide.
3. It makes the answer and button elements visible.
4. It disables options (<li> elements) after clicking upon them.
5. If the answer is correct, it highlights the text with green. Otherwise, it will be red.
6. It changes the text of the result depending on whether the answer is correct or not.
7. If the answer is correct, it increments the counter of correct answers (correctAnswers). For this, you need to set the correctAnswers variable at zero before defining the function.
To execute this function, you’ll need to add the following CSS rules:
// src/style.css

.answer, .button { display: none; }

.disabled { pointer-events: none; }

.correct { color: green; }
.incorrect { color: red; }

.green a::before { background: green; }
.red a::before { background: red; }
showNextSlide
This function is called within the button element of the <Quiz /> component:
<button onClick={showNextSlide} className="button">Next</button>
Here is the full code for the showNextSlide function:
const showNextSlide = (e) => {
  let slides = document.getElementsByClassName("slide");
  let visibleSlide = e.target.parentElement;

  for (var i = 0; i < slides.length; i++) {
    if (visibleSlide.nextSibling) {
      visibleSlide.classList.toggle("visible");
      visibleSlide.classList.add("invisible");
      visibleSlide.nextSibling.classList.remove("invisible");
      visibleSlide.nextSibling.classList.add("visible");
    } else {
      visibleSlide.classList.remove("visible");
      visibleSlide.classList.add("invisible");
      let result = document.getElementById("result");
      result.classList.remove("invisible");
      result.classList.add("visible");
      checkAnswers();
    }
  }
}
This function takes one argument: e, which is short for event, an object containing information about the action that just happened. When you click, a click event is triggered.
Here is what this function does:
1. It makes the visible slide invisible, finds its next siblings and makes it visible.
2. If there are no next siblings, the function shows the final slide with quiz results.
checkAnswers
This function is called within the showNextSlide function:
const showNextSlide = (e) => {
    ...
    checkAnswers();
}
Here is the full code for the checkAnswers function:
const checkAnswers = () => {
  let correctNum = parseInt((correctAnswers / data.length) * 100);
  let tip;
  if (correctNum <= 30) {
    tip = " Don't give up and learn JavaScript!";
  } else if (correctNum <= 50) {
    tip = " You can start your Junior Front-End Developer career at Dominos' Pizza!";
  } else if (correctNum <= 90) {
    tip = " Well done! You're better than average!";
  } else {
    tip = " Send your CV to Google right now!";
  }
  let result = "You've given <span>" + correctNum + "%</span> of correct answers." + tip;
  document.getElementById("summary").innerHTML = result;
}
Here is what this function does:
1. It calculates the number of correct answers.
2. It defines the text of the result message depending on how much the user scored.
3. It forms the whole result message and puts it inside the #summary element within the <Result /> component.
4. Rendering method
Finally, use the ReactDOM.render method to display React elements on the screen:
ReactDOM.render(
  <Playfield
    quizes={data}
    title="How good are you at front-end development?"
  />,
  document.getElementById("react-container")
);
Production Build and Deployment
You can publish your app on GitHub Pages.
1. Visit the GitHub and log in there.
2. Create a New Repository and name it as “my-app” or give it another name as you like. To publish your app on GitHub Pages, your repository must be public.
3. Open your app in Visual Studio Code and then open the package.json file.
4. In package.json, create the “homepage” property and give it a value like ”https://www.username.github.io/reponame”, where “username” is your name on GitHub and “reponame” is the name of the repository:
{
  "name": "my-app",
  "version": "0.1.0",
  "private": true,
  "homepage": "https://www.username.github.io/reponame",
  "dependencies": {...}
  ...
}
5. In package.json, also add "deploy" : "gh-pages -d build" inside scripts:
"scripts": {
  "start": "react-scripts start",
  "build": "react-scripts build",
  "deploy": "gh-pages -d build",
  "test": "react-scripts test",
  "eject": "react-scripts eject"
},
6. Write the following commands in your terminal:
cd my-app
git remote add origin https://github.com/username/reponame.git
git remote set-url origin https://github.com/username/reponame.git
7. So far, we’ve done everything in a development environment. For production, you’d want to have static files loading in but none of the source code. You can do this by making a build and deploying it. Type in the terminal the following code:
npm run build
This will create a production build. You will see in the file structure that a build folder with static files has been generated.
8. Type the following command in your terminal to install gh-pages that is the name of the branch in your GitHub repository:
npm install gh-pages --save-dev
9. Finally, type the following command in your terminal to deploy the build:
npm run deploy
10. Go to the GitHub repository you created on Step 2, select the gh-pages branch, open Settings, scroll down to the GitHub Pages and you’ll see an URL. Open it, and you’ll see your app running live.
You can access the quiz app on GitHub Pages.
Read also: